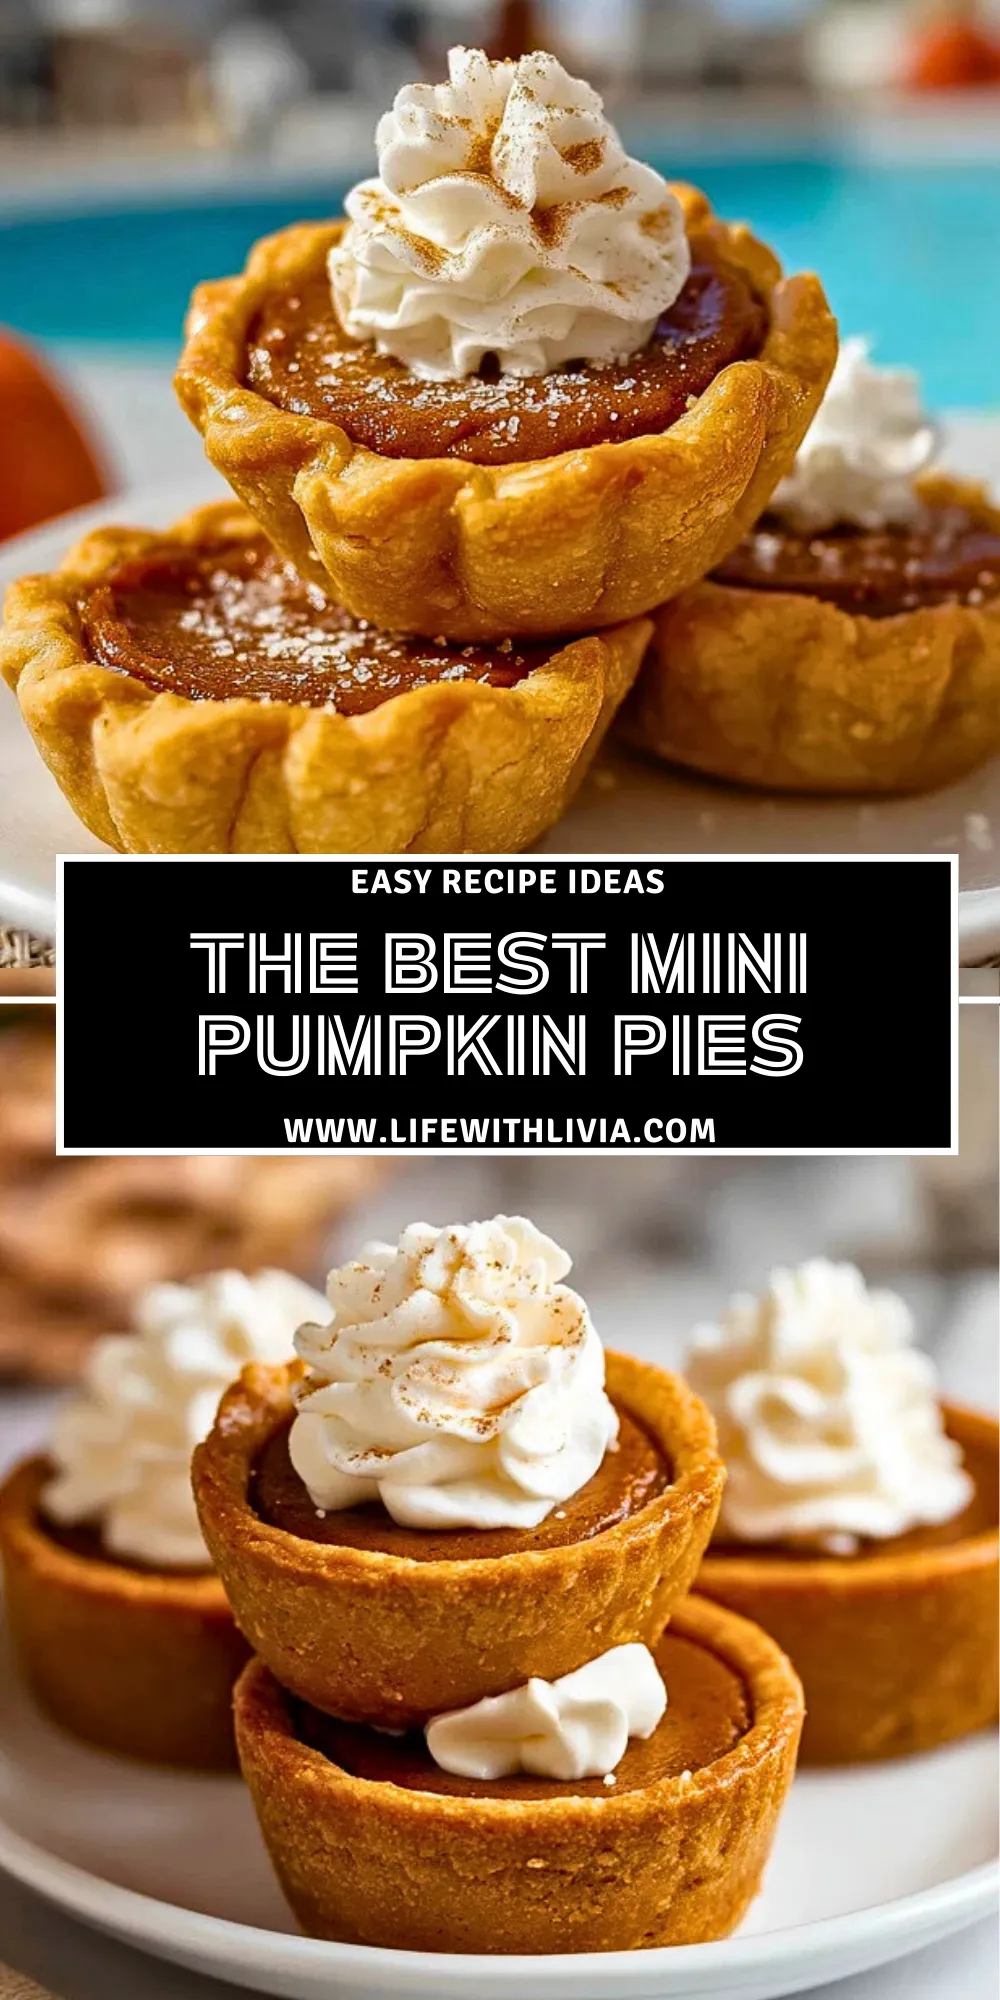
These mini pumpkin pies pack all the cozy, spiced flavor of a classic holiday dessert into a buttery, handheld bite. Flaky crust, silky pumpkin filling, and a cloud of whipped cream on top make them an instant crowd-pleaser for parties, potlucks, or just a weekend baking session.

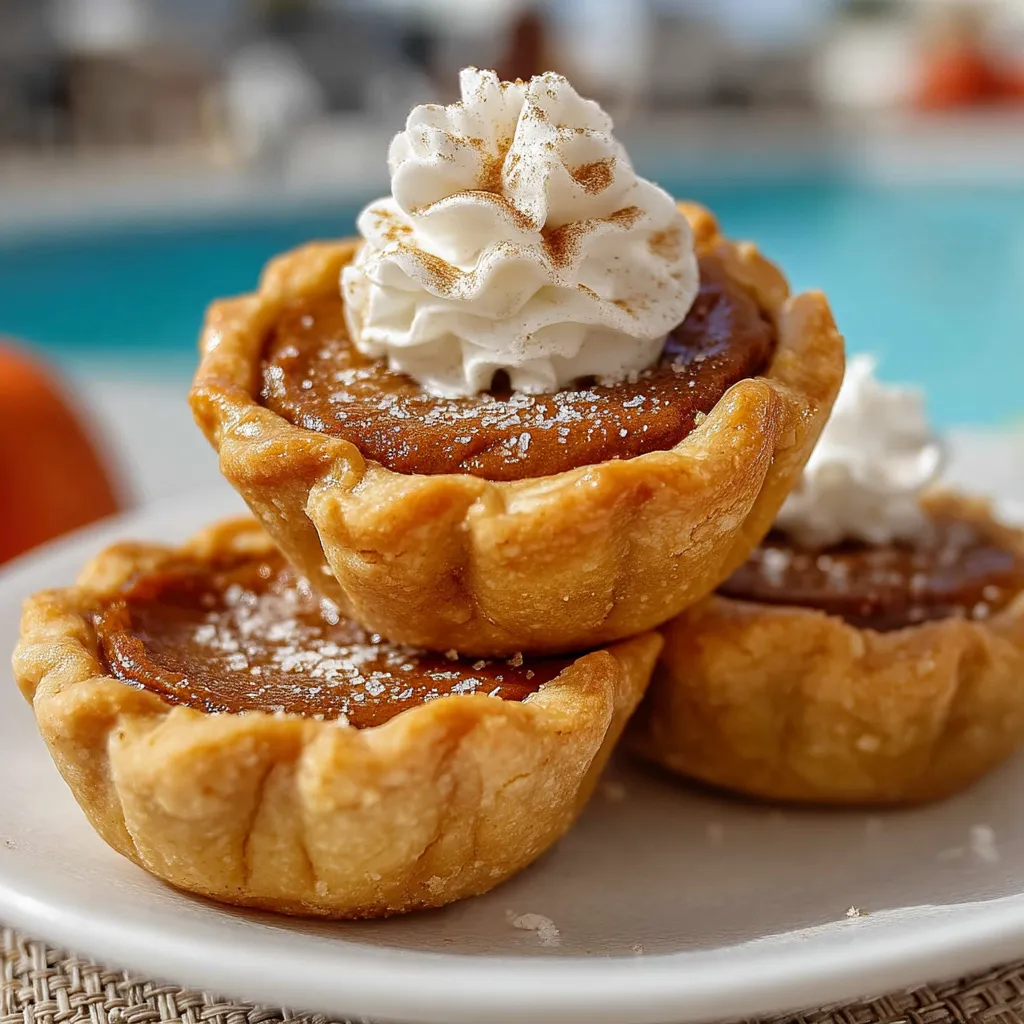
Because they’re baked in a muffin tin, everyone gets their own perfectly portioned pie with crisp edges and a creamy center. They bake faster than a full-sized pie, cool more quickly, and look gorgeous on a dessert platter—especially with a sprinkle of powdered sugar and cinnamon.
Why You’ll Love These Mini Pumpkin Pies
Mini pumpkin pies are everything you love about traditional pumpkin pie, just more fun and easier to share. The crust stays extra flaky, the filling sets beautifully, and there’s plenty of room for a generous swirl of whipped cream.
They’re also incredibly convenient. You can prep them a day ahead, chill them, and simply add the whipped cream right before serving. They travel well, freeze nicely, and are just the right size for guests who want “just a little something sweet”… or two.
What Kind of Crust Works Best for Mini Pumpkin Pies?
You can use refrigerated store-bought pie crusts or your favorite homemade recipe—whatever you’re most comfortable with. As long as the dough is rolled to a similar thickness as a standard pie crust, it will bake up golden and flaky in the muffin tins.
If you already love a homemade crust like a traditional all-butter or shortening-based pie dough, feel free to use that here. Just be sure to chill the dough well before cutting and shaping the rounds so the crust holds its shape and browns evenly.
Ingredients
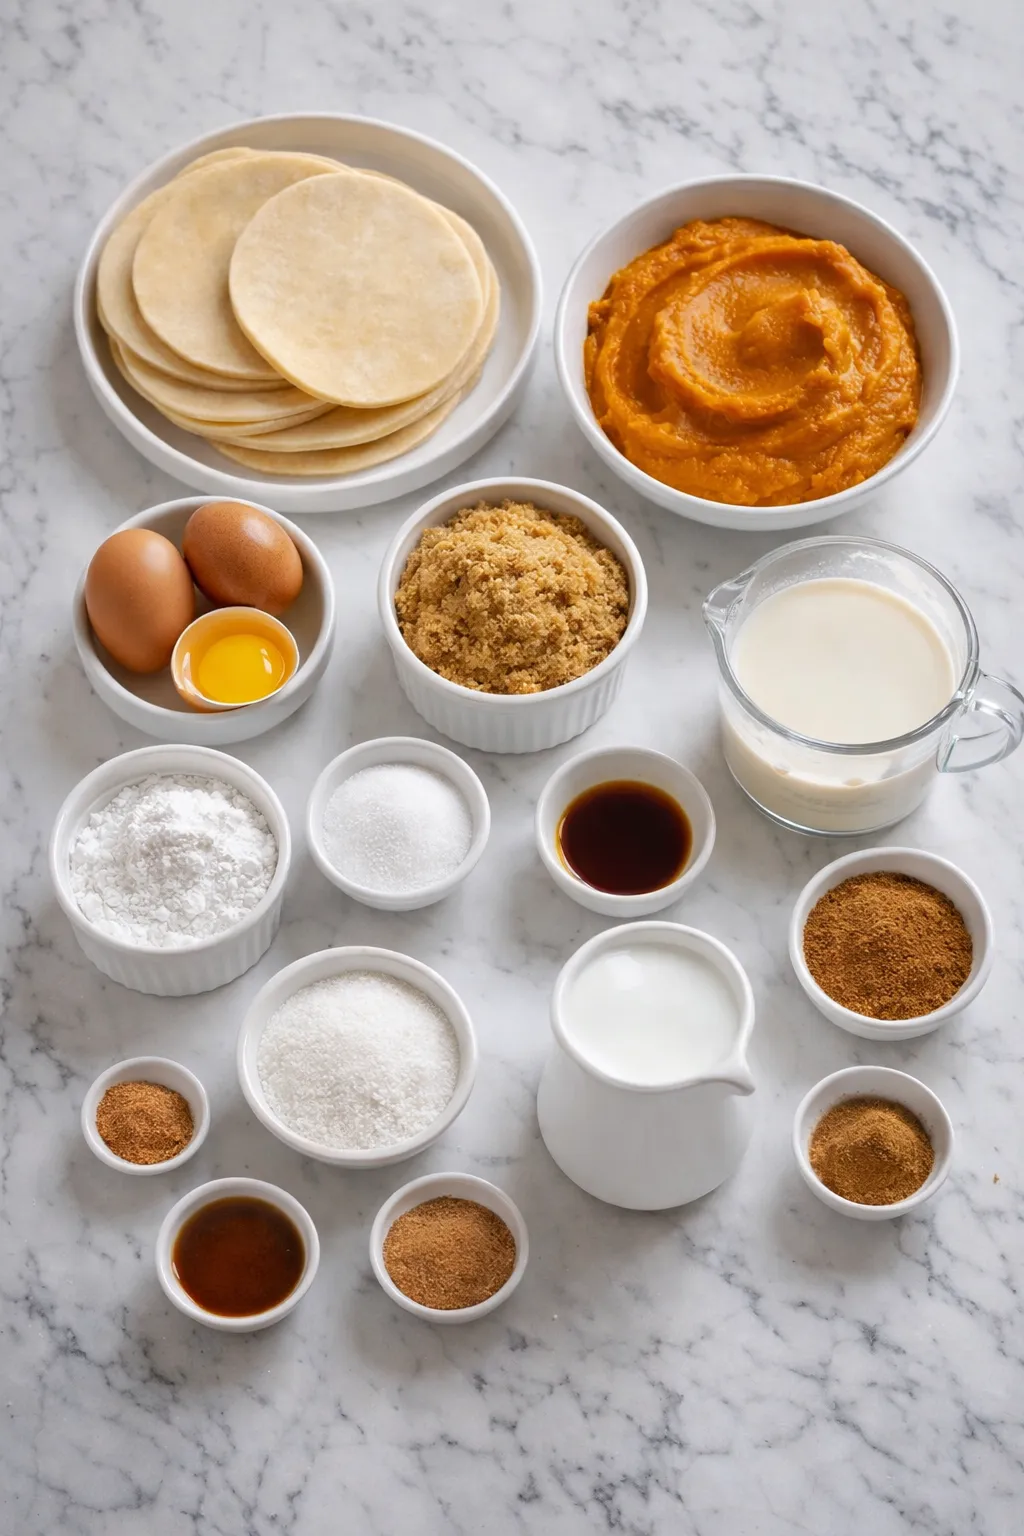
Before you start baking, take a moment to see how each ingredient earns its place in these mini pumpkin pies.
- Pie crusts – Use refrigerated pie crusts or a homemade dough for a flaky, buttery base that holds the creamy pumpkin filling.
- Nonstick cooking spray – Helps the mini pies release cleanly from the muffin tin so the edges stay pretty and intact.
- Pumpkin puree – The star of the show, providing rich flavor and a naturally silky texture; be sure to use pure pumpkin, not pumpkin pie filling.
- Eggs – Bind the filling and give it structure so the centers set softly without becoming dry or rubbery.
- Egg yolk – Adds extra richness and a custard-like mouthfeel to the filling.
- Brown sugar – Brings in deep caramel notes and moisture, keeping the filling luscious.
- Granulated sugar – Balances the spices and brightens the pumpkin flavor.
- Evaporated milk – Creates a smooth, creamy custard filling that bakes up tender and sliceable.
- Vanilla extract – Rounds out the flavors and adds a warm, sweet aroma to the filling.
- Pumpkin pie spice – Delivers that classic blend of cinnamon, nutmeg, ginger, and cloves in a single spoonful.
- Ground cinnamon – Boosts the warm spice flavor both in the filling and as an optional sprinkle on top.
- Fine sea salt – Highlights all the flavors and keeps the sweetness in balance.
- Heavy whipping cream – Whips into a fluffy topping that contrasts beautifully with the dense pumpkin filling.
- Powdered sugar – Sweetens the whipped cream and can be dusted over the finished pies for a bakery-style finish.
- Additional ground cinnamon (optional) – A light sprinkle over the whipped cream adds color and extra spice.
How To Make The Best Mini Pumpkin Pies
Step 1: Prep the Pan and Preheat the Oven
Lightly spray a 12-cup muffin tin with nonstick cooking spray, making sure to coat the sides and bottoms of each well. This helps the mini pies pop out easily after baking.
Preheat your oven so it’s fully heated by the time your crusts are ready. A hot oven encourages the crust to puff and turn golden while the filling gently sets.
Step 2: Cut and Shape the Crusts
Unroll the pie crusts onto a lightly floured surface. Use a round cutter or the rim of a glass to cut circles slightly larger than the muffin cups.
Press each round gently into the prepared muffin tin, letting the edges fold or ruffle naturally for a pretty, crimped look. Gather and re-roll any scraps as needed until all 12 cups are lined.
Step 3: Give the Crust a Head Start
To keep the crusts flaky and prevent soggy bottoms, prick the bases lightly with a fork. Bake the empty crusts briefly until they look just barely set and dry on the surface.
This quick pre-bake helps the crust hold its shape once the pumpkin filling is added, so your mini pies come out crisp and sturdy.
Step 4: Mix the Pumpkin Pie Filling
In a mixing bowl, whisk together the pumpkin puree, eggs, and egg yolk until smooth and well combined. Stir in the brown sugar and granulated sugar until the mixture looks glossy.
Add the vanilla extract, pumpkin pie spice, ground cinnamon, and salt, whisking until the spices are evenly distributed. Finally, whisk in the evaporated milk until the filling is silky and pourable.
Step 5: Fill and Bake the Mini Pies
Carefully pour or spoon the pumpkin filling into the warm crusts, filling each almost to the top while leaving a little room for the filling to puff.
Return the muffin tin to the oven and bake until the edges are set and the centers still have a slight jiggle when gently shaken. The tops should look matte and lightly puffed.
Step 6: Cool Completely
Transfer the muffin tin to a wire rack and let the mini pies cool in the pan until they reach room temperature. As they cool, the centers will finish setting and the pies will be easier to remove.
Once cooled, run a thin knife around the edges if needed and gently lift each mini pumpkin pie out of the tin. Chill them in the refrigerator if you prefer serving them cold.
Step 7: Whip the Topping and Garnish
Just before serving, whip the heavy cream with powdered sugar and a splash of vanilla until soft, billowy peaks form.
Pipe or spoon a generous swirl of whipped cream onto each chilled mini pumpkin pie. Finish with a dusting of powdered sugar and a pinch of ground cinnamon for that bakery-style look.
Serving Mini Pumpkin Pies
Mini pumpkin pies are at their best when slightly chilled with a fluffy crown of whipped cream. The cool filling and cold cream contrast beautifully with the crisp, buttery crust.
This recipe makes 12 mini pies, which is perfect for serving 8–12 people depending on whether everyone enjoys one little pie or goes back for seconds. Arrange them on a platter for a dessert table, tuck them into lunchboxes, or serve them alongside coffee after a holiday meal.
Storing Mini Pumpkin Pies
Because the filling is custard-based, mini pumpkin pies should be stored in the refrigerator once they’ve cooled. Place them in a single layer in an airtight container and refrigerate for up to 3 days. Add the whipped cream topping just before serving so it stays fresh and fluffy.
To freeze, skip the whipped cream and wrap each cooled mini pie individually in plastic wrap, then place them in a freezer bag or airtight container. Freeze for up to 2 months. Thaw overnight in the refrigerator, then top with freshly whipped cream and a sprinkle of cinnamon before serving.
If you like your pies slightly warm, you can reheat them in a 300°F (150°C) oven for a few minutes. Just keep in mind that reheating after freezing may soften the crust slightly, so don’t overbake.
Frequently Asked Questions
Can I use pumpkin pie filling instead of pumpkin puree?
It’s best to use pure pumpkin puree rather than canned pumpkin pie filling. Pumpkin pie filling already contains sugar and spices, which would throw off the carefully balanced flavors and sweetness in this recipe.
Do I have to blind-bake the crust?
While the crust isn’t fully blind-baked, giving it a short head start in the oven helps prevent sogginess and keeps the edges crisp. Skipping this step can lead to a softer, less flaky crust, especially near the bottom.
Can I make mini pumpkin pies ahead of time?
Yes! You can bake the mini pies up to a day in advance. Store them covered in the refrigerator and wait to add the whipped cream until just before serving. This makes them ideal for holidays or parties when oven space is tight.
What can I use instead of evaporated milk?
You can substitute an equal amount of heavy cream or half-and-half for a similarly rich texture. Whole milk will work in a pinch but will make the filling slightly lighter and less creamy.
How do I know when the mini pumpkin pies are done?
Look for set edges and centers that still wobble slightly when you gently shake the pan. If the centers are completely firm and puffed high, they may be overbaked and could crack as they cool.
Want More Pumpkin Dessert Ideas?
If these mini pumpkin pies have you craving even more cozy fall treats, you’ll love these other pumpkin-forward desserts:
- Try a classic slice of Pumpkin Bread when you want an easy loaf that doubles as breakfast and dessert.
- Bake a batch of soft, spiced Soft Pumpkin Snickerdoodles with Cinnamon Sugar for those who love chewy cookies.
- Go for extra gooey with Chewy Pumpkin Blondies with Warm Spices when you’re in the mood for bars instead of pie.
- For a mashup dessert, make velvety Layered Pumpkin Cheesecake that combines cheesecake creaminess with pumpkin pie flavor.
- Don’t miss ultra-comforting Rich Pumpkin Crisp if you’re all about crunchy topping and soft, spiced filling.
Save This Pin For Later
📌 Save these mini pumpkin pies to your favorite dessert or holiday Pinterest board so you can find them again when pumpkin season rolls around.
I’d love to hear how your mini pumpkin pies turn out—did you use homemade crust or store-bought? Did you go extra heavy on the whipped cream or keep them simple and rustic?
Share your tweaks, questions, and baking wins, and don’t forget you can find even more cozy dessert inspiration over on Life With Livia on Pinterest.
Print The Best Mini Pumpkin Pies
- Total Time: 49 minutes
- Yield: 12 mini pumpkin pies
Description
Mini pumpkin pies are the perfect easy dessert for fall holidays, cozy gatherings, and make-ahead entertaining—flaky pie crust is tucked into a muffin tin, filled with silky spiced pumpkin custard, and baked into individual treats that chill beautifully, travel well, and pair with whipped cream for quick breakfast ideas, dessert boards, and holiday food ideas when you need an easy recipe that feels special without a lot of work.
Ingredients
2 refrigerated pie crusts softened slightly
Nonstick cooking spray for the muffin tin
1 1/2 cups pumpkin puree not pumpkin pie filling
2 large eggs
1 large egg yolk
1/2 cup packed light brown sugar
1/4 cup granulated sugar
3/4 cup evaporated milk
1 teaspoon vanilla extract
1 1/2 teaspoons pumpkin pie spice
1/2 teaspoon ground cinnamon
1/4 teaspoon fine sea salt
1 cup cold heavy whipping cream
2 tablespoons powdered sugar
1/2 teaspoon vanilla extract
1 tablespoon powdered sugar for dusting optional
Ground cinnamon for dusting optional
Instructions
1. Lightly spray a 12 cup muffin tin with nonstick cooking spray, making sure the bottoms and sides of each cup are evenly coated, then set the pan aside.
2. Preheat the oven to 375°F (190°C) so it is fully heated by the time the crusts are ready to bake.
3. Unroll the refrigerated pie crusts onto a lightly floured surface and let them soften just enough to be pliable.
4. Use a round cookie cutter or drinking glass slightly larger than the muffin cups to cut 12 circles from the dough, rerolling scraps as needed.
5. Press each dough circle into a prepared muffin cup, gently easing the dough into the bottom and up the sides while letting the edges ruffle naturally for a pretty, crimped look.
6. Prick the bottoms of the crusts a few times with a fork to prevent puffing and place the muffin tin in the preheated oven.
7. Bake the empty crusts for 8 minutes, just until the surface looks dry and the edges are barely starting to turn pale golden, then remove the pan from the oven.
8. While the crusts parbake, whisk the pumpkin puree, eggs, and egg yolk together in a medium mixing bowl until smooth and well combined.
9. Add the brown sugar and granulated sugar to the bowl and whisk until the mixture looks glossy and the sugars are mostly dissolved.
10. Whisk in the vanilla extract, pumpkin pie spice, ground cinnamon, and fine sea salt until the spices are evenly distributed throughout the filling.
11. Slowly pour in the evaporated milk while whisking constantly, mixing until the filling is silky, smooth, and pourable.
12. Carefully divide the pumpkin filling among the warm crusts, filling each muffin cup almost to the top while leaving a small space for the filling to puff as it bakes.
13. Return the muffin tin to the oven and bake for 16 to 18 minutes, or until the edges of the filling are set and the centers still have a slight jiggle when the pan is gently shaken.
14. Transfer the pan to a wire rack and let the mini pumpkin pies cool completely in the muffin tin so the custard can finish setting.
15. Once the pies are at room temperature, run a thin knife around the edges if needed and gently lift each mini pie out of the pan, then refrigerate for at least 1 hour to chill.
16. Just before serving, add the cold heavy whipping cream, powdered sugar, and vanilla extract to a clean mixing bowl.
17. Beat with a hand mixer or whisk until soft, billowy peaks form and the whipped cream holds its shape but still looks smooth and fluffy.
18. Pipe or spoon a generous dollop of whipped cream onto each chilled mini pumpkin pie.
19. Dust the tops lightly with the extra tablespoon of powdered sugar and a pinch of ground cinnamon if desired, then serve immediately or refrigerate until ready to enjoy.
Notes
For the best texture, do not overbake the pies—pull them from the oven while the centers still have a slight wobble, as they will continue to set while cooling and stay creamy instead of becoming dry or cracked.
- Prep Time: 25 minutes
- Cook Time: 24 minutes
- Category: Dessert
- Method: Baking
- Cuisine: American
Nutrition
- Serving Size: 1 mini pumpkin pie
- Calories: 300
- Sugar: 19
- Sodium: 170
- Fat: 18
- Saturated Fat: 10
- Unsaturated Fat: 7
- Trans Fat: 0
- Carbohydrates: 30
- Fiber: 1
- Protein: 4
- Cholesterol: 80
Keywords: mini pumpkin pies, pumpkin dessert, individual pumpkin pies, easy pumpkin pie, fall dessert, Thanksgiving dessert