Adorable Bear Cookies are the kind of treat that instantly makes people smile before they even take the first bite. With their soft pink cookie base, sweet little faces, and playful bear ears, these cookies feel perfect for Valentine’s Day, birthday parties, baby showers, or any baking day when you want something especially cute and memorable.

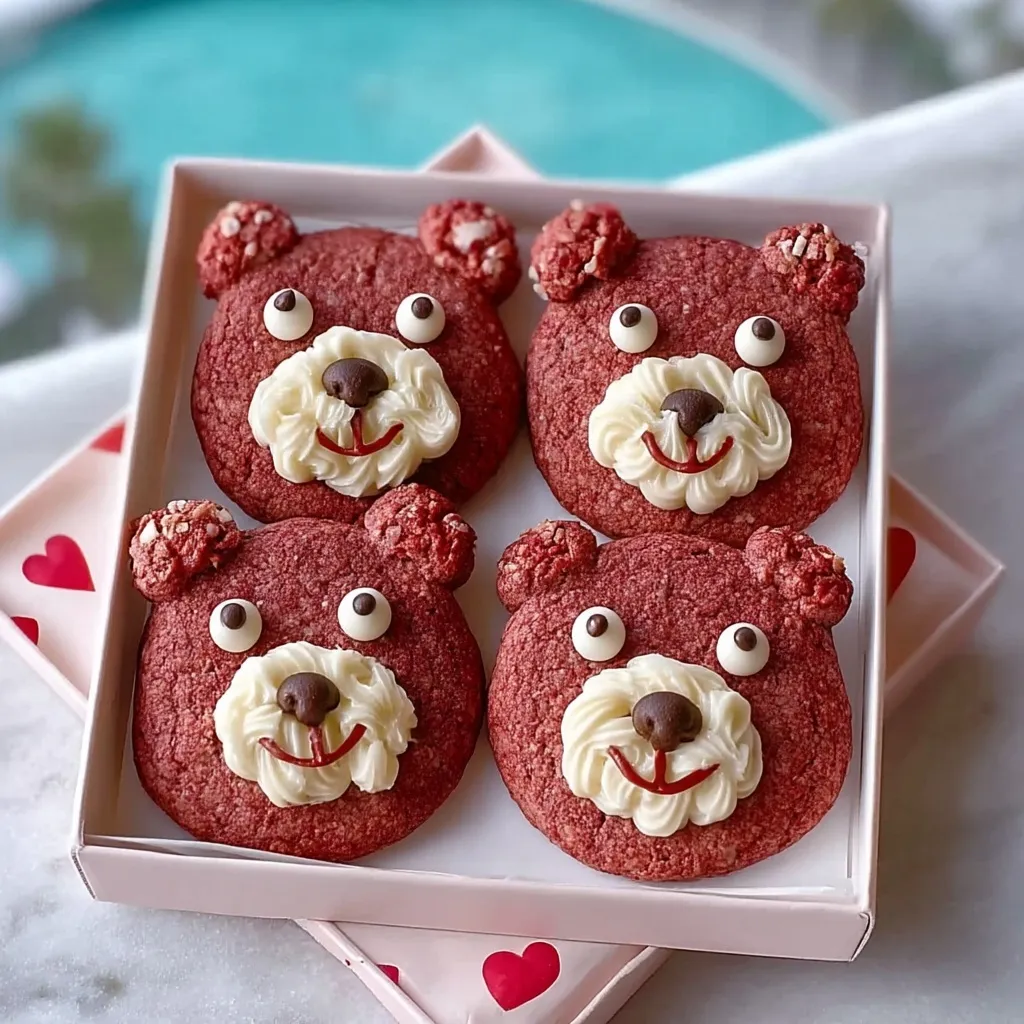
What makes them even better is that they are not just pretty to look at. These cookies bake up soft and tender, with a rich buttery flavor and a festive color that stands out beautifully on any dessert table. Once you add the white chocolate details and tiny heart accents, they turn into a bakery-style dessert that looks impressive but can absolutely be made at home.
Why You’ll Love These Adorable Bear Cookies
These Adorable Bear Cookies bring together everything people love in a themed dessert. They are soft, sweet, colorful, and eye-catching, which makes them a fun choice for gifting or sharing. The design looks detailed, but the decorating process is simple once the cookies have cooled.
They also give you room to be creative. You can make each face slightly different, use pink or red tones, swap in candy hearts, or keep the decorations minimal for a cleaner look. They are a wonderful baking project for holidays, parties, or weekend baking with kids.
What Kind of Decorations Should I Use for Adorable Bear Cookies?
The easiest way to decorate these cookies is with melted white chocolate or candy melts for the muzzle and ears, plus a little melted chocolate for the nose and mouth details. Small heart sprinkles are perfect for adding charm around the face. If you want the cookies to look neat and polished, use a piping bag or a zip-top bag with a tiny corner snipped off so you can place each detail with better control.
You can also keep the decorations flexible based on what you already have. White frosting, royal icing, mini marshmallow pieces, or small fondant shapes can all help create the same adorable bear look. The goal is to keep the face simple, sweet, and easy to recognize.
Ingredients

Before you start mixing, gather your ingredients and decorations so the shaping and decorating process feels easy from beginning to end. Since these cookies are all about appearance as much as flavor, choosing ingredients that support color, softness, and clean decoration lines will make a big difference.
- All-purpose flour: Gives the cookies structure so they hold their bear shape while baking.
- Baking powder: Helps the cookies rise slightly and keeps the texture soft instead of dense.
- Salt: Balances the sweetness and rounds out the buttery flavor.
- Unsalted butter: Creates richness and a tender cookie crumb.
- Granulated sugar: Sweetens the dough and helps the cookies spread just enough.
- Egg: Binds the dough and adds moisture for a soft bite.
- Vanilla extract: Adds warm bakery-style flavor that works beautifully with the decorations.
- Red or pink food coloring: Gives the cookies their signature rosy bear look.
- White chocolate or white candy melts: Used for the muzzle, ear centers, and decorative accents.
- Milk chocolate or melted chocolate: Creates the nose and mouth details.
- Pink heart sprinkles: Add a playful finishing touch around the bear faces.
How To Make the Adorable Bear Cookies
After the dough is mixed, the real fun starts. Shaping the ears and decorating the faces is what gives these cookies their charm, so take your time and enjoy the process.
Step 1: Prepare the Baking Sheets
Line your baking sheets with parchment paper so the cookies release easily and the bottoms bake evenly. This also makes cleanup much simpler once the decorating begins.
Step 2: Mix the Dry Ingredients
Whisk together the flour, baking powder, and salt in a bowl. This helps distribute the leavening evenly so the cookies bake with a consistent texture.
Step 3: Cream the Butter and Sugar
Beat the butter and sugar until light and fluffy. This step adds air to the dough and helps create soft cookies with a tender crumb.
Step 4: Add the Egg, Vanilla, and Color
Mix in the egg and vanilla extract until smooth, then add the food coloring until the dough reaches a rosy pink shade. The color should look slightly brighter than you want the finished cookies to be, since baking can soften it a bit.
Step 5: Combine the Dough
Add the dry mixture to the wet ingredients and mix just until a soft dough forms. Avoid overmixing so the cookies stay tender.
Step 6: Shape the Bear Faces
Scoop portions of dough onto the prepared baking sheets and gently flatten them into round shapes. Add two small dough pieces at the top of each round to form the ears, pressing lightly so they stay attached during baking.
Step 7: Bake Until Set
Bake the cookies until the edges are set and the centers look just done. They should stay soft rather than turning crisp, since that softer texture suits the cute decorated style best.
Step 8: Cool Completely
Let the cookies rest on the baking sheet briefly, then transfer them to a wire rack. The cookies must be fully cool before decorating so the chocolate details stay clean and defined.
Step 9: Decorate the Bear Faces
Pipe or spoon melted white chocolate onto each cookie to make the muzzle and small ear accents. Add melted chocolate for the nose and mouth, then finish with pink heart sprinkles near the cheeks for the sweetest final look.
Cute Ways to Serve Adorable Bear Cookies
Adorable Bear Cookies are best served as a sweet centerpiece on a dessert tray, cookie box, or party table. Their playful design makes them perfect for Valentine’s Day treats, birthday celebrations, classroom parties, baby showers, or homemade edible gifts. You can pair them with hot chocolate, strawberry milk, tea, or coffee for a cozy dessert moment.
This recipe comfortably feeds about 12 people, depending on cookie size and how many other desserts are being served. If you are making them for gifting or a party, it is a great idea to double the batch because they disappear fast once people see them.
How to Store Adorable Bear Cookies
Store the cookies in an airtight container at room temperature for up to 4 days. Place parchment paper between layers if the decorations are slightly raised so the faces stay neat and do not smudge.
For longer storage, you can refrigerate them for up to 1 week, especially if your kitchen is warm and the chocolate decorations soften easily. Let them come to room temperature before serving for the best texture.
These cookies can also be frozen, though it is best to freeze them before adding the decorative details if you want the prettiest finish. Freeze the baked cookies in a well-sealed container for up to 2 months, thaw them at room temperature, and then decorate once they are fully defrosted.
Frequently Asked Questions
Can I make Adorable Bear Cookies ahead of time?
Yes, these cookies are great for making ahead. You can bake the cookies a day or two in advance and decorate them later once you are ready to serve or package them. This makes party prep much easier.
What is the best way to keep the bear ears from falling off?
Press the smaller ear pieces firmly but gently onto the main cookie dough round before baking. Making sure the dough pieces touch well will help them bake together into one solid cookie shape.
Can I use royal icing instead of melted chocolate?
Absolutely. Royal icing works well for the muzzle, ears, and facial details if you prefer a more traditional decorated-cookie finish. Just allow enough drying time before stacking or storing the cookies.
Do I need special tools to decorate these cookies?
Not at all. A spoon, toothpick, or small zip-top bag with the corner cut off can do the job. Fancy piping tools can help, but they are not necessary for creating a cute result.
Can I change the color for different occasions?
Yes, that is one of the easiest ways to customize them. Use pink for Valentine’s Day, pastel shades for baby showers, brighter colors for birthdays, or even brown tones for a more classic teddy bear look.
Want More Cookie Ideas?
If you loved making these Adorable Bear Cookies, you might also enjoy a few more sweet bakes from the site:
- Small Batch Almond Joy Cookies for a coconut-chocolate cookie with candy bar flavor.
- Laura Bush’s Cowboy Cookies when you want a hearty bakery-style cookie packed with texture.
- Cheesecake Stuffed Chocolate Chip Cookies for an extra indulgent dessert with a creamy center.
- Chocolate Hazelnut Crunch Cookies if you are craving rich chocolate flavor with a crisp bite.
Save This Pin For Later
📌 Save this recipe to your Pinterest dessert board so you can come back to it any time.
And let me know in the comments how yours turned out. Did you keep the classic pink bear design or make your own color twist? Did you use white chocolate, icing, or a mix of both for the details?
I love hearing how others make these recipes their own. Questions are welcome too, and for even more daily recipe inspiration, visit Life With Livia.
Print Adorable Bear Cookies
- Total Time: 32 minutes
- Yield: 12 cookies
- Diet: Vegetarian
Description
These Adorable Bear Cookies are a cute and easy dessert idea with a soft buttery texture, pretty pink color, and sweet chocolate details that make them perfect for parties, holiday baking, Valentine’s Day treats, and fun food ideas for kids and adults alike. Whether you need an easy recipe for a dessert board, a festive snack, or creative baking ideas to share, these charming cookies bring playful style and delicious flavor to every batch.
Ingredients
2 1/4 cups all-purpose flour
1 teaspoon baking powder
1/4 teaspoon salt
3/4 cup unsalted butter, softened
1 cup granulated sugar
1 large egg
1 teaspoon vanilla extract
1 teaspoon pink or red food coloring
1 cup white chocolate or white candy melts, melted
1/4 cup milk chocolate, melted
2 tablespoons pink heart sprinkles
Instructions
1. Preheat the oven to 350°F and line two baking sheets with parchment paper.
2. Whisk together the flour, baking powder, and salt in a medium bowl.
3. In a large bowl, beat the butter and sugar until light and fluffy.
4. Mix in the egg, vanilla extract, and food coloring until fully combined.
5. Add the dry ingredients to the wet ingredients and mix just until a soft dough forms.
6. Scoop portions of dough onto the prepared baking sheets and shape each into a round bear face.
7. Add two small dough pieces at the top of each round to form the ears, pressing gently so they attach well.
8. Bake for 10 to 12 minutes, or until the edges are set and the centers are just baked through.
9. Let the cookies cool on the baking sheet for 5 minutes, then transfer to a wire rack to cool completely.
10. Pipe or spoon melted white chocolate onto each cookie to create the muzzle and ear centers.
11. Use melted milk chocolate to add the nose and mouth details.
12. Finish with pink heart sprinkles near the cheeks and let the decoration set before serving.
Notes
Do not decorate the cookies while they are still warm, or the chocolate details can melt, slide, and lose the clean bear face shape.
- Prep Time: 20 minutes
- Cook Time: 12 minutes
- Category: Dessert
- Method: Baking
- Cuisine: American
Nutrition
- Serving Size: 1 cookie
- Calories: 245
- Sugar: 18g
- Sodium: 75mg
- Fat: 12g
- Saturated Fat: 7g
- Unsaturated Fat: 4g
- Trans Fat: 0g
- Carbohydrates: 32g
- Fiber: 1g
- Protein: 3g
- Cholesterol: 32mg
Keywords: adorable bear cookies, cute cookies, pink cookies, Valentine cookies, easy dessert, party dessert, holiday baking, food ideas, easy recipe