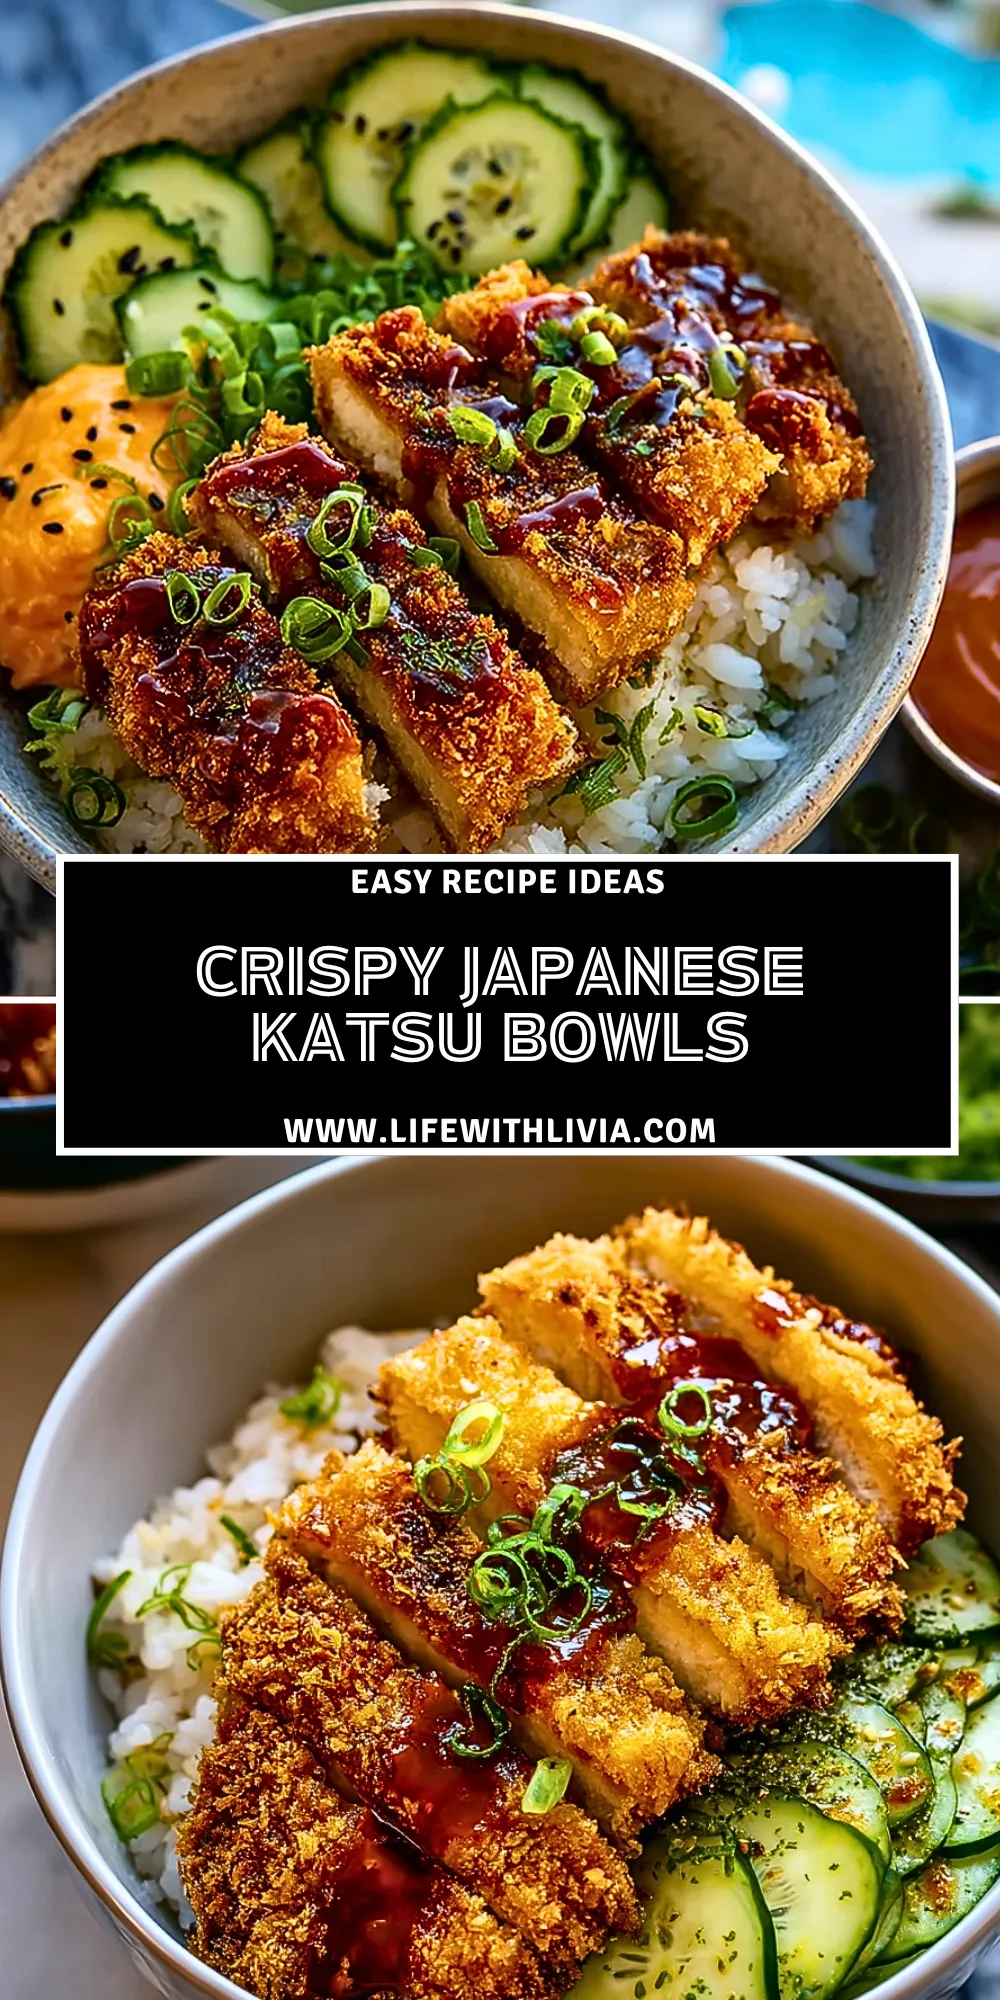
Crispy Japanese Katsu Bowls bring together everything people love about a cozy rice bowl: golden crunchy chicken, fluffy rice, cool vegetables, fresh herbs, and a glossy sweet-savory sauce that ties every bite together. The contrast is what makes this dish so satisfying—the katsu is hot and crisp, the cucumbers are refreshing, and the rice soaks up just enough sauce without becoming heavy.
This is the kind of dinner that feels restaurant-worthy but still works beautifully for a weeknight. You can prepare the toppings while the chicken cooks, use leftover rice to save time, and build each bowl exactly how you like it. It is crisp, colorful, filling, and easy to customize for family dinners, meal prep lunches, or a weekend Japanese-inspired comfort meal.
Why You’ll Love This Crispy Japanese Katsu Bowls
These bowls deliver big texture without complicated steps. The chicken is coated in panko for that signature Japanese-style crunch, then sliced over rice so every piece stays juicy inside and crisp outside. The toppings add freshness, the sauce adds depth, and the bowl format makes it feel complete without needing many side dishes.
You will also love how flexible this meal can be. Chicken cutlets are classic, but the same method works with pork, tofu, or even eggplant. You can keep the toppings simple with cucumber and scallions, or add shredded cabbage, carrots, pickled ginger, avocado, sesame seeds, or spicy mayo. It is a dependable dinner idea when you want something comforting but not boring.
What Makes Katsu So Crispy?
The crunch comes from panko breadcrumbs, which are lighter and flakier than regular breadcrumbs. They create a rough, airy coating that fries or air-fries into a crisp shell instead of a dense crust. For the best texture, the chicken should be patted dry, coated in flour, dipped in egg, then pressed firmly into panko so the crumbs cling well.
Another key is heat control. If the oil is too cool, the coating absorbs grease and turns heavy. If it is too hot, the outside browns before the chicken cooks through. A steady medium-high heat gives the katsu a golden crust while keeping the meat tender and juicy.
Ingredients
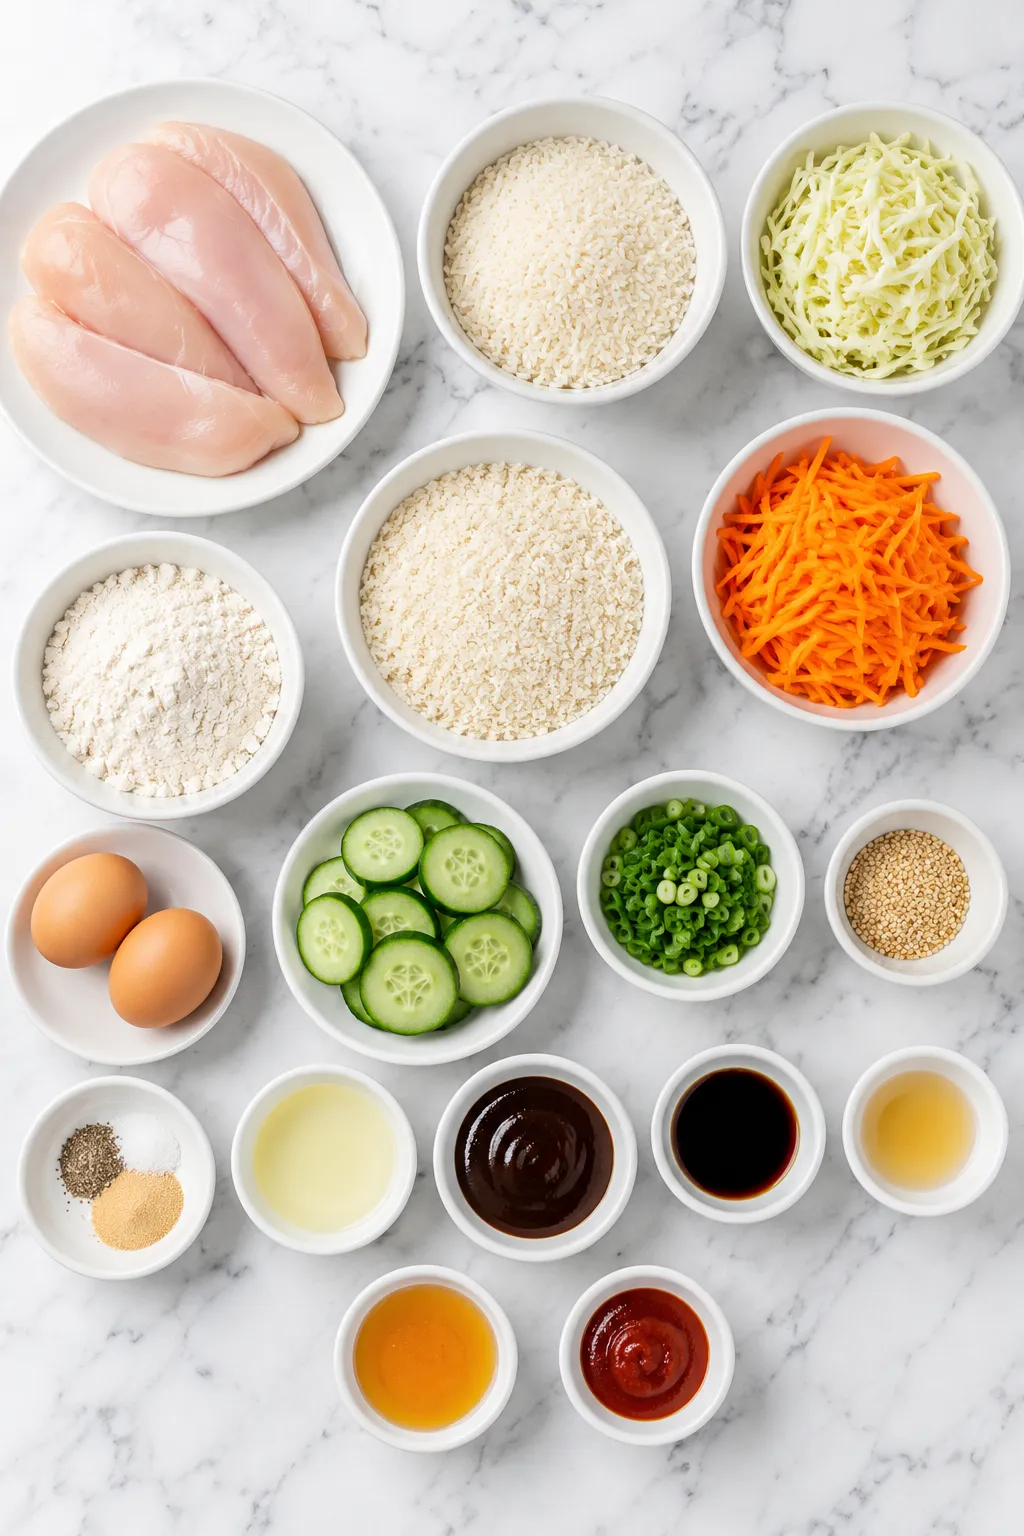
Before you start cooking, gather everything for the crispy cutlets, rice base, toppings, and sauce. This keeps the process smooth because katsu cooks quickly once the coating is on.
- Chicken cutlets — Thin boneless chicken pieces cook evenly and stay juicy under the crisp panko crust.
- Panko breadcrumbs — Essential for the light, jagged crunch that makes Japanese katsu special.
- All-purpose flour — Helps the egg coating stick to the chicken and creates a better crust.
- Eggs — Bind the panko to the chicken so the breading stays in place while cooking.
- Salt and black pepper — Season the chicken directly so the flavor does not rely only on the sauce.
- Garlic powder — Adds a gentle savory note to the breading without overpowering the bowl.
- Neutral oil — Best for pan-frying because it can handle heat without competing with the katsu flavor.
- Cooked white rice — A soft, warm base that balances the crisp chicken and catches the sauce.
- Cucumber — Adds cool crunch and freshness against the rich katsu.
- Shredded carrots — Bring sweetness, color, and a fresh bite to the bowl.
- Green onions — Add brightness and a mild onion flavor as a finishing garnish.
- Sesame seeds — Give a nutty finish and a little extra texture.
- Tonkatsu sauce — Provides the classic sweet, tangy, savory flavor over the crispy chicken.
- Soy sauce — Deepens the sauce with salty umami.
- Rice vinegar — Adds gentle acidity to keep the bowl balanced.
- Honey or brown sugar — Rounds out the sauce with a touch of sweetness.
- Sriracha or chili sauce — Optional, but great for adding mild heat.
- Shredded cabbage — A classic katsu bowl topping that adds crunch and makes the bowl feel lighter.
How To Make the Crispy Japanese Katsu Bowls
The easiest way to make this dish is to prep the rice and toppings first, then bread and cook the chicken right before serving. That way the katsu stays hot and crisp when it lands in the bowl.
Step 1: Prepare the Bowl Base
Cook the rice if you are starting from dry rice, or warm leftover rice until fluffy and steaming. Slice the cucumbers, shred the carrots, chop the green onions, and set out any extra toppings such as cabbage, sesame seeds, or spicy mayo. Having the toppings ready prevents the chicken from sitting too long after cooking.
Step 2: Make the Sauce
In a small bowl, stir together tonkatsu sauce, soy sauce, rice vinegar, honey or brown sugar, and a little chili sauce if you want heat. Taste and adjust until it hits the right balance of sweet, salty, tangy, and savory. Set the sauce aside so it is ready to drizzle over the sliced katsu.
Step 3: Flatten and Season the Chicken
Pat the chicken dry with paper towels. If the pieces are thick, gently pound them into even cutlets so they cook at the same speed. Season both sides with salt, black pepper, and garlic powder. This step matters because a well-seasoned cutlet tastes good even before the sauce goes on.
Step 4: Bread the Chicken
Set up three shallow bowls: one with flour, one with beaten eggs, and one with panko breadcrumbs. Coat each cutlet lightly in flour, dip it into egg, then press it firmly into the panko. Make sure the surface is fully covered, especially along the edges, so the crust fries evenly.
Step 5: Cook Until Golden and Crisp
Heat neutral oil in a skillet over medium-high heat. Add the breaded chicken and cook until the crust is deep golden and the chicken is cooked through, flipping once halfway. Work in batches if needed so the pan is not crowded. Crowding traps steam, and steam softens the coating.
Step 6: Rest and Slice the Katsu
Transfer the cooked chicken to a wire rack or paper towel-lined plate. Let it rest briefly before slicing, which helps the juices settle and keeps the crust from sliding off. Cut the chicken into strips so it is easy to eat with rice and toppings.
Step 7: Assemble the Bowls
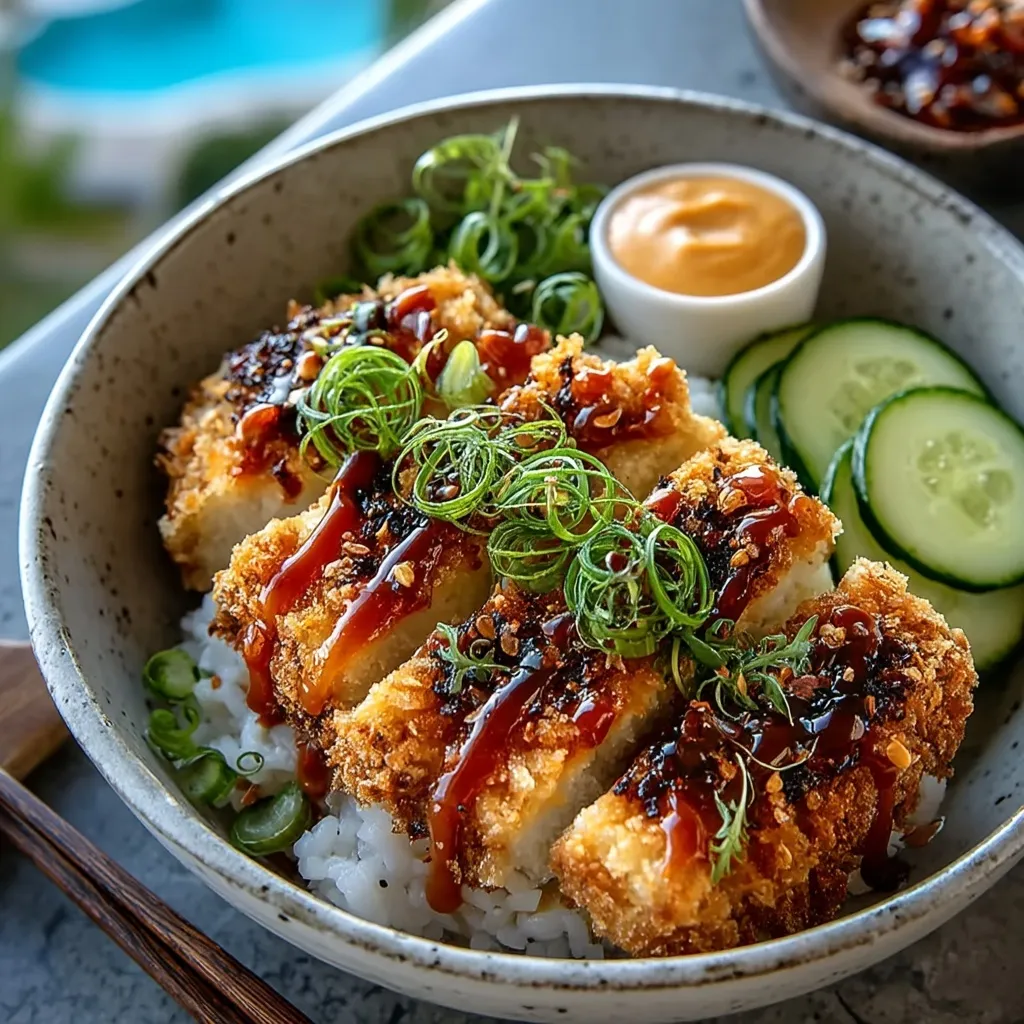
Spoon rice into each bowl, then add cucumber, carrots, cabbage, and any other toppings you like. Lay the sliced katsu over the rice, drizzle with sauce, and finish with green onions and sesame seeds. Serve right away while the coating is at its crispiest.
How to Serve Crispy Japanese Katsu Bowls
Crispy Japanese Katsu Bowls are best served immediately after the chicken is cooked and sliced. This recipe comfortably feeds 4 people, especially when served with rice, vegetables, and a generous drizzle of sauce. For bigger appetites, add extra rice or serve with miso soup, edamame, or a small cucumber salad on the side.
For a balanced bowl, aim for a mix of hot, crisp, cool, and saucy. Start with warm rice, add a handful of crunchy vegetables, then place the katsu on top so it stays crisp instead of getting buried. Sauce can be drizzled over the chicken, served on the side for dipping, or used lightly over the rice for extra flavor.
These bowls also work well for a build-your-own dinner. Set out sliced katsu, rice, sauce, cucumbers, cabbage, carrots, scallions, sesame seeds, and spicy mayo, then let everyone assemble their own plate. It is a fun way to serve picky eaters because the base is simple but the toppings are flexible.
How to Store Crispy Japanese Katsu Bowls
For best results, store the chicken, rice, toppings, and sauce separately. The katsu coating softens when it sits against rice or sauce, so keeping each part in its own container helps preserve texture. Refrigerate cooked chicken in an airtight container for up to 3 days.
To reheat the katsu, use an oven, toaster oven, or air fryer until warmed through and crisp again. Avoid microwaving the chicken if possible because it can make the crust soggy. Rice can be reheated separately with a small splash of water to bring back moisture.
Fresh toppings such as cucumber, cabbage, and green onions are best added after reheating. The sauce can be stored in a small jar or covered container in the refrigerator for several days. If you are meal prepping, pack the rice and chicken together only after the chicken has cooled, and keep the sauce in a separate cup until serving.
Frequently Asked Questions
Can I make Crispy Japanese Katsu Bowls in the air fryer?
Yes, you can make the katsu in an air fryer. Spray the breaded chicken well with oil on both sides, then air fry until golden and cooked through, flipping halfway. The texture may be slightly lighter than pan-fried katsu, but it still becomes crisp if the panko is coated with enough oil and the chicken is not stacked or crowded.
What is the best chicken to use for katsu bowls?
Boneless, skinless chicken breasts or chicken thighs both work. Chicken breasts give you clean, even slices and a leaner finish, while thighs are richer and harder to overcook. Whichever you choose, the most important step is making the pieces even in thickness so the breading browns at the same time the chicken cooks through.
Can I use store-bought tonkatsu sauce?
Absolutely. Store-bought tonkatsu sauce is convenient and gives the bowl that familiar sweet and tangy flavor. You can use it as-is, or stretch it into a quick bowl sauce with soy sauce, rice vinegar, honey, and a little chili sauce. That small adjustment helps the sauce taste brighter and more homemade.
How do I keep the katsu crispy after cooking?
Place cooked katsu on a wire rack instead of directly on a plate. A rack allows steam to escape from underneath, which helps prevent the bottom crust from turning soft. Also, wait to drizzle the sauce until right before serving, or serve sauce on the side for dipping.
Can I make these bowls ahead of time?
You can prep many parts ahead, but the chicken is best cooked fresh. Rice, sauce, sliced vegetables, and garnishes can all be prepared in advance. If you need to cook the chicken ahead, reheat it in an air fryer or hot oven to bring back some crispness before assembling the bowls.
Want More Bowl and Chicken Dinner Ideas?
If these Crispy Japanese Katsu Bowls are your kind of dinner, you’ll probably enjoy a few more satisfying meals with big flavor, easy prep, and plenty of texture:
- Spicy Thai Peanut Chicken Bowl for a creamy, nutty chicken bowl with a little heat.
- Chili Lime Shrimp Tacos Bowl when you want something fresh, zesty, and colorful.
- Honey Sesame Chicken for a sweet-savory chicken dinner that pairs beautifully with rice.
- Bang Bang Chicken if you love crispy chicken with a creamy spicy sauce.
Save This Pin For Later
📌 Save this Crispy Japanese Katsu Bowls recipe to your Pinterest dinner board so you can come back to it any time you need a crunchy, saucy, satisfying meal.
And let me know in the comments how yours turned out. Did you use chicken breast or thighs? Did you keep the sauce classic or add extra heat?
I love seeing how these bowls come together in different kitchens. For more daily recipes and fresh dinner inspiration, follow Life With Livia on Pinterest.
Print Crispy Japanese Katsu Bowls
- Total Time: 35 minutes
- Yield: 4 servings
Description
Crispy Japanese Katsu Bowls are the kind of easy dinner that feels bold, crunchy, and comforting all at once. Juicy chicken cutlets are coated in panko, cooked until golden, sliced over fluffy rice, and finished with fresh vegetables and a sweet-savory katsu sauce. This easy recipe is perfect for quick dinner ideas, family food ideas, meal prep bowls, and Japanese-inspired weeknight meals.
Ingredients
4 boneless skinless chicken cutlets
1 cup panko breadcrumbs
1/2 cup all-purpose flour
2 large eggs
1 teaspoon salt
1/2 teaspoon black pepper
1/2 teaspoon garlic powder
1/3 cup neutral oil
4 cups cooked white rice
1 cup sliced cucumber
1 cup shredded carrots
1 cup shredded cabbage
1/4 cup sliced green onions
1 tablespoon sesame seeds
1/2 cup tonkatsu sauce
2 tablespoons soy sauce
1 tablespoon rice vinegar
1 tablespoon honey
1 teaspoon sriracha
Instructions
1. Cook or warm the rice and divide it between serving bowls.
2. Slice the cucumber, shred the carrots and cabbage, and chop the green onions.
3. Stir together tonkatsu sauce, soy sauce, rice vinegar, honey, and sriracha in a small bowl.
4. Pat the chicken dry, then season both sides with salt, black pepper, and garlic powder.
5. Place flour, beaten eggs, and panko breadcrumbs into three separate shallow bowls.
6. Coat each chicken cutlet in flour, dip it in egg, then press it firmly into panko breadcrumbs.
7. Heat neutral oil in a skillet over medium-high heat.
8. Cook the breaded chicken until golden brown and cooked through, flipping once halfway.
9. Transfer the chicken to a rack or paper towel-lined plate and let it rest briefly.
10. Slice the katsu into strips and place it over the rice bowls.
11. Add cucumber, carrots, cabbage, green onions, and sesame seeds.
12. Drizzle with the katsu sauce and serve immediately.
Notes
Do not overcrowd the skillet when frying the chicken. Too many pieces in the pan will lower the oil temperature and create steam, which can make the panko coating soft instead of crisp.
- Prep Time: 20 minutes
- Cook Time: 15 minutes
- Category: Dinner
- Method: Pan-Fried
- Cuisine: Japanese-Inspired
Nutrition
- Serving Size: 1 bowl
- Calories: 610
- Sugar: 9g
- Sodium: 980mg
- Fat: 23g
- Saturated Fat: 4g
- Unsaturated Fat: 17g
- Trans Fat: 0g
- Carbohydrates: 65g
- Fiber: 4g
- Protein: 36g
- Cholesterol: 145mg
Keywords: crispy Japanese katsu bowls, chicken katsu bowl, easy dinner, rice bowl recipe, Japanese-inspired dinner, panko chicken, quick dinner ideas, food ideas