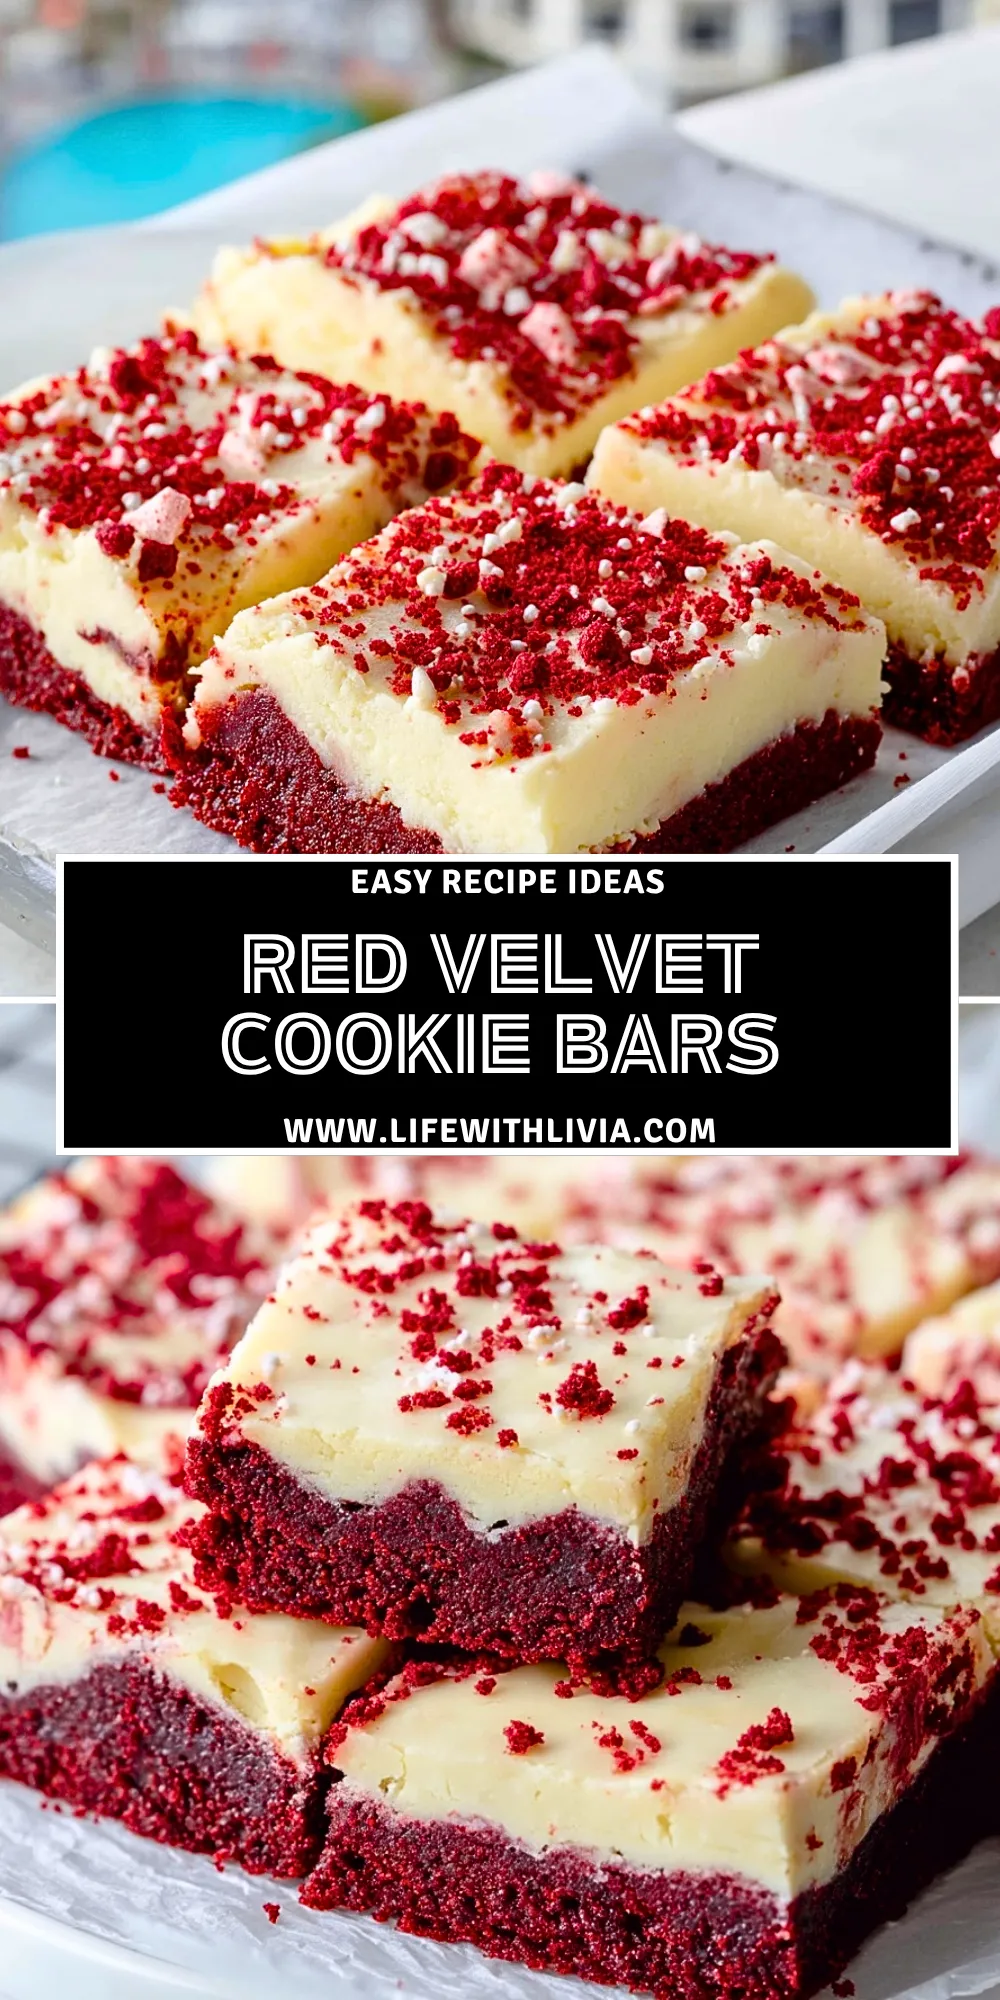
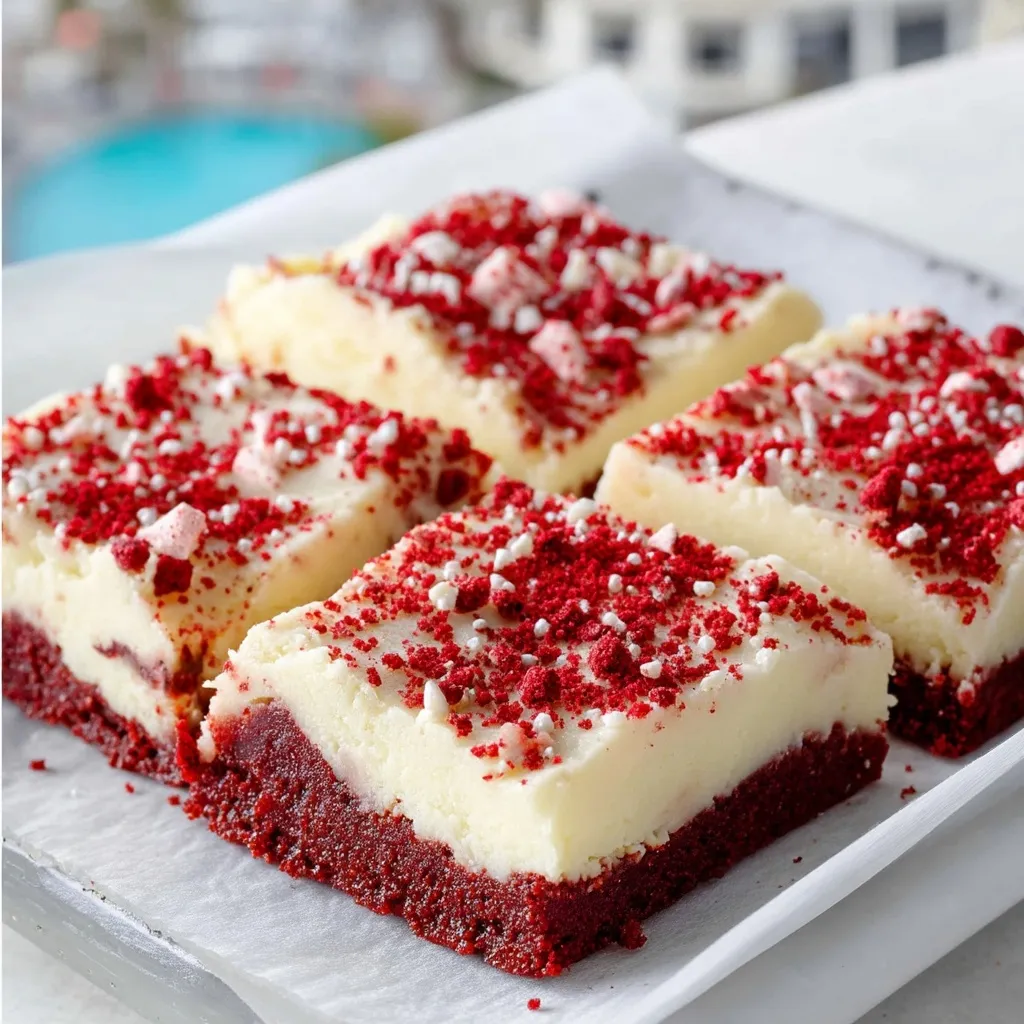
Red Velvet Cookie Bars are the kind of dessert that looks bakery-pretty but feels completely doable in a home kitchen. They have that deep cocoa-kissed red velvet flavor, a soft cookie-bar bite, and a creamy vanilla frosting layer that makes every square feel rich, festive, and a little nostalgic.
These bars are perfect when you want the charm of red velvet cake without stacking layers or piping frosting. Slice them into neat squares for holidays, birthdays, bake sales, Valentine’s Day, Christmas dessert trays, or any night when a soft red velvet treat sounds better than ordinary cookies.
Why You’ll Love This Red Velvet Cookie Bars
These Red Velvet Cookie Bars deliver the best parts of cookies, brownies, and cake in one easy pan. The base bakes up chewy and tender, the frosting adds creamy sweetness, and the red crumb topping gives the whole dessert a beautiful finished look without complicated decorating.
They are also easy to make ahead, easy to slice, and simple to transport. Because everything bakes in one pan, this is a great dessert for parties or gifting, especially when you want something that feels special but does not require fussy steps.
What Makes Red Velvet Cookie Bars Different From Brownies?
Red velvet cookie bars are softer and more cookie-like than classic brownies. Brownies usually lean heavily on chocolate and a dense, fudgy texture, while these bars use a lighter cocoa flavor, vanilla notes, and a tender cookie base.
The cream cheese-style frosting also changes the whole experience. Instead of a deeply chocolate square, you get a sweet, tangy, creamy topping over a red velvet base that is chewy around the edges and soft in the center.
Ingredients
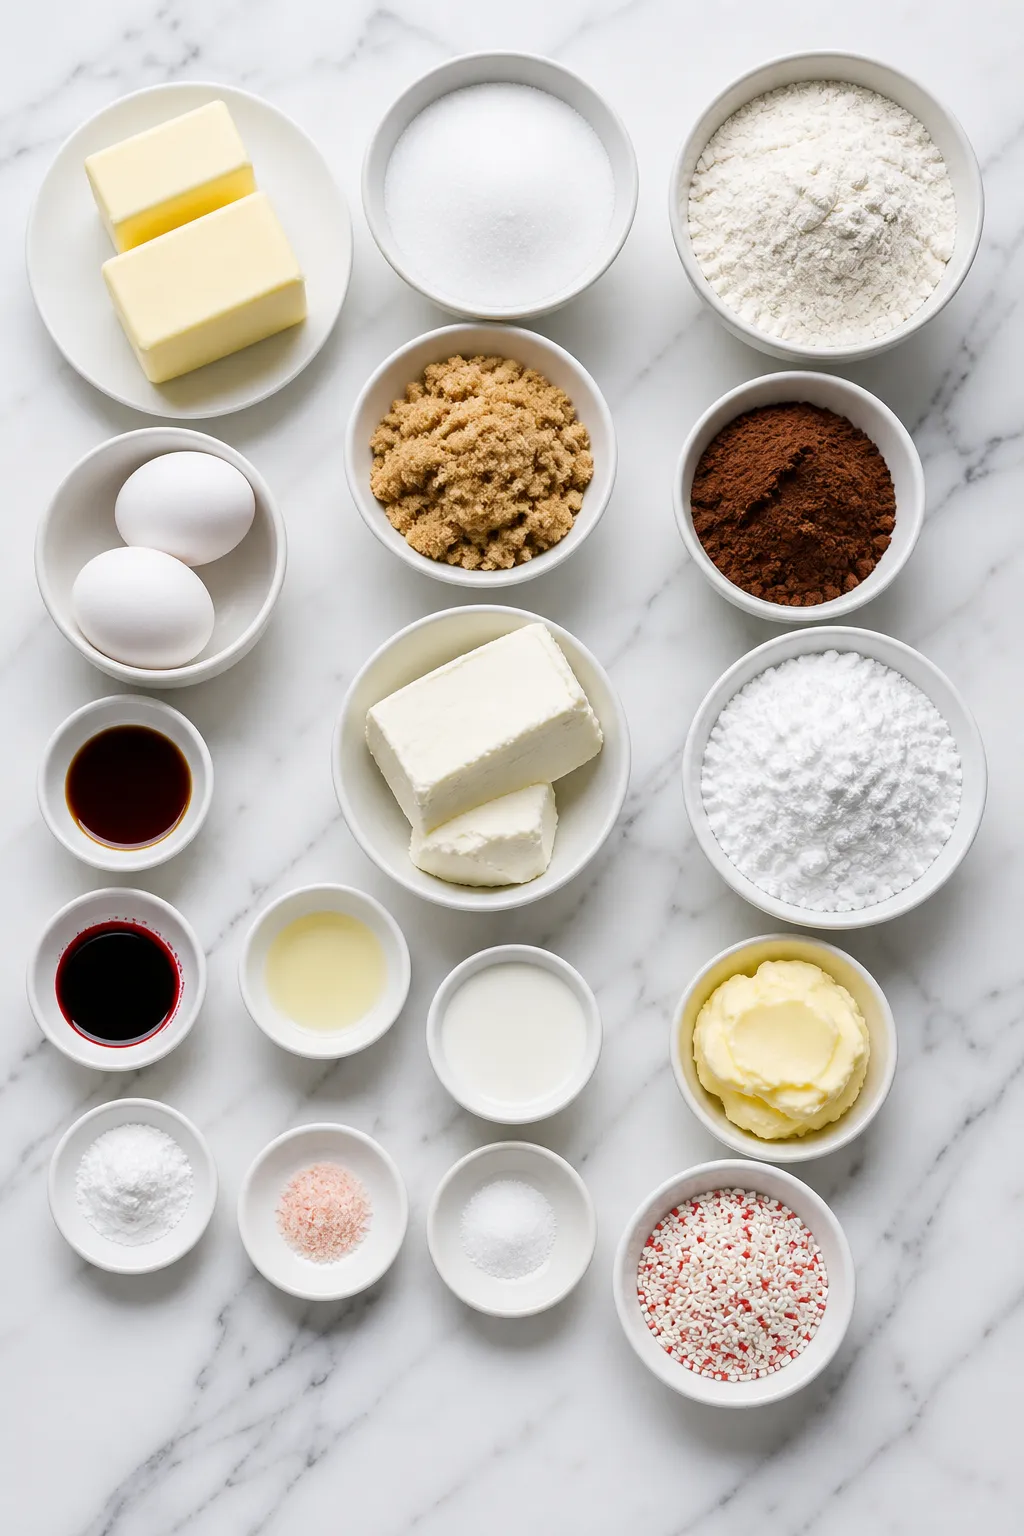
These ingredients work together to create a soft red velvet cookie base, a creamy frosting layer, and a pretty crumb topping. The exact measurements belong in the printable recipe card, but this overview explains why each ingredient matters before you start baking.
- All-purpose flour — Gives the bars their structure while keeping the texture soft and sliceable.
- Unsweetened cocoa powder — Adds the gentle chocolate flavor that makes red velvet taste distinct without turning the bars into brownies.
- Baking powder — Helps the cookie layer rise just enough for a tender bite.
- Salt — Balances the sweetness and makes the cocoa and vanilla flavors stand out.
- Unsalted butter — Creates richness, moisture, and that classic cookie-bar texture.
- Granulated sugar — Sweetens the dough and helps the edges bake up lightly chewy.
- Brown sugar — Adds moisture and a deeper, softer sweetness.
- Eggs — Bind the dough and help the bars set properly.
- Vanilla extract — Rounds out the cocoa and brings warmth to the red velvet flavor.
- Red gel food coloring — Gives the bars their bold red color without adding too much liquid to the dough.
- White vinegar — Adds a subtle tang and supports the traditional red velvet flavor profile.
- Cream cheese — Creates a smooth, tangy frosting that balances the sweetness of the bars.
- Powdered sugar — Sweetens and thickens the frosting so it spreads cleanly.
- Heavy cream — Loosens the frosting for a silky, spreadable finish.
- White sprinkles or sanding sugar — Adds a pretty crunch and a bakery-style finish.
- Red velvet crumbs — Give the top extra color, texture, and a polished look.
How To Make the Red Velvet Cookie Bars
The process is simple: mix the dry ingredients, build a soft red velvet dough, bake it until just set, then cool and frost. Letting the bars cool completely before frosting is the key to clean layers and neat slices.
Step 1: Prepare the Pan
Line a square baking pan with parchment paper, leaving a little overhang so the bars are easy to lift out later. Lightly grease any exposed sides. Preheat the oven so the dough goes into steady heat, which helps the bars bake evenly.
Step 2: Mix the Dry Ingredients
Whisk the flour, cocoa powder, baking powder, and salt in a bowl. This helps spread the cocoa and leavening evenly through the dough so the bars have a consistent flavor and texture from edge to center.
Step 3: Cream the Butter and Sugars
In a larger bowl, beat the softened butter with the granulated sugar and brown sugar until the mixture looks creamy and slightly fluffy. This step gives the bars a softer cookie texture instead of a heavy, compact crumb.
Step 4: Add the Wet Ingredients
Beat in the eggs, vanilla extract, red gel food coloring, and vinegar. Mix until the color is even and the dough looks smooth. Scrape down the bowl as needed so no pale streaks of butter or sugar remain.
Step 5: Combine the Dough
Add the dry ingredients to the wet mixture and stir just until no dry flour remains. Avoid overmixing, because too much mixing can make cookie bars firm instead of tender.
Step 6: Bake the Red Velvet Base
Press most of the dough evenly into the prepared pan. Reserve a small piece of dough for making crumbs, or bake a thin scrap separately if you want a red crumb topping. Bake the main layer until the edges look set and the center no longer appears wet.
Step 7: Cool Completely
Let the bars cool in the pan before lifting them out. This keeps the base from breaking and prevents the frosting from melting into the cookie layer. For the cleanest slices, chill the cooled base briefly before frosting.
Step 8: Make the Creamy Frosting
Beat the cream cheese and butter until smooth, then add powdered sugar, vanilla, and a splash of cream. Mix until the frosting is creamy and spreadable. The frosting should be thick enough to hold its shape but soft enough to glide across the bars.
Step 9: Frost and Decorate
Spread the frosting over the cooled red velvet cookie base. Crumble the reserved baked red velvet pieces over the top, then add white sprinkles or sanding sugar. Chill the bars until the frosting is firm enough to slice neatly.
Step 10: Slice and Serve
Use the parchment to lift the bars from the pan, then cut them into squares with a sharp knife. Wipe the knife between cuts for cleaner edges and a prettier presentation.
Best Ways to Serve Red Velvet Cookie Bars
These Red Velvet Cookie Bars feed about 12 people when sliced into generous squares, or up to 16 people if you cut smaller dessert-tray portions. They are rich enough that a small square feels satisfying, especially with the creamy frosting on top.
Serve them chilled for the neatest, firmest bite, or let them sit at room temperature for a few minutes if you prefer a softer frosting texture. They pair beautifully with coffee, hot cocoa, cold milk, or a simple scoop of vanilla ice cream for a more indulgent dessert plate.
For parties, arrange the bars on a white platter so the red color stands out. A few extra crumbs scattered on top right before serving make them look fresh and bakery-style.
How to Store Red Velvet Cookie Bars
Because these bars are topped with a cream cheese-style frosting, store them in an airtight container in the refrigerator. They keep well for about 4 to 5 days, and the flavor often becomes even better after the first day as the frosting settles into the red velvet base.
For the best texture, place parchment paper between layers if you need to stack them. This prevents the frosting from sticking to the bottom of the bars above it.
You can also freeze Red Velvet Cookie Bars. Freeze them uncovered on a tray until the frosting is firm, then wrap the bars tightly and place them in a freezer-safe container. They can be frozen for up to 2 months. Thaw overnight in the refrigerator before serving, then let them sit at room temperature for 10 to 15 minutes if you want a softer bite.
Frequently Asked Questions
Can I make Red Velvet Cookie Bars ahead of time?
Yes, these bars are a great make-ahead dessert. Bake and frost them one day before serving, then keep them covered in the refrigerator. Chilling actually helps the frosting set and makes the bars easier to slice into clean squares.
Do I have to use red gel food coloring?
Gel food coloring works best because it gives a strong red color without thinning the dough. Liquid food coloring can work in a pinch, but it may require more product and can slightly change the dough texture. You can also reduce the coloring if you prefer a softer red shade.
Why did my bars turn out dry?
Dry bars usually come from overbaking or measuring too much flour. Pull the pan from the oven when the edges are set and the center looks baked but still soft. The bars will continue to firm as they cool, so waiting until the center is hard can lead to a dry texture.
Can I use store-bought frosting?
You can use store-bought cream cheese frosting when you need a shortcut. Homemade frosting gives a fresher flavor and better tang, but a good-quality prepared frosting will still make the bars sweet, creamy, and easy to finish.
Can I make these without the crumb topping?
Absolutely. The red velvet crumbs make the bars look extra pretty, but they are not required. You can top the frosting with white chocolate curls, mini chocolate chips, festive sprinkles, crushed cookies, or leave the top smooth and simple.
Want More Cookie Bar and Dessert Ideas?
If you love these Red Velvet Cookie Bars, you’ll probably enjoy these sweet treats too:
- Red Velvet Cheesecake Brownies for another creamy red velvet dessert with a fudgy twist.
- Sugar Cookie Cheesecake when you want a soft, sweet dessert with a creamy bakery-style finish.
- Chocolate Hazelnut Crunch Cookies for rich chocolate flavor with a little crisp texture.
- Chocolate Snowball Cookies With White Chocolate Center if you love pretty cookies with a hidden sweet center.
Save This Pin For Later
📌 Save these Red Velvet Cookie Bars to your Pinterest dessert board so you can come back to them whenever a red velvet craving hits.
And when you make them, let me know how they turned out. Did you keep the crumb topping classic, add sprinkles, or dress them up for a holiday platter?
I love seeing how everyone gives these desserts their own little twist. For even more daily dessert ideas and cozy kitchen inspiration, follow Life With Livia.
Print Red Velvet Cookie Bars
- Total Time: 46 minutes
- Yield: 16 bars
- Diet: Vegetarian
Description
These Red Velvet Cookie Bars are soft, chewy, creamy, and perfect when you want an easy dessert that looks beautiful without extra fuss. With a cocoa-kissed red velvet cookie base, smooth cream cheese frosting, and a pretty crumb topping, this easy recipe is ideal for holiday baking, Valentine’s Day desserts, party food ideas, Christmas treats, bake sale sweets, and simple dessert ideas for sharing.
Ingredients
1 cup unsalted butter, softened
1 cup granulated sugar
1/2 cup light brown sugar, packed
2 large eggs
2 teaspoons vanilla extract
1 tablespoon red gel food coloring
1 teaspoon white vinegar
2 1/4 cups all-purpose flour
1/4 cup unsweetened cocoa powder
1 teaspoon baking powder
1/2 teaspoon salt
8 ounces cream cheese, softened
1/4 cup unsalted butter, softened
2 cups powdered sugar
1 teaspoon vanilla extract
1 tablespoon heavy cream
2 tablespoons white sprinkles or sanding sugar
Instructions
1. Preheat the oven to 350°F and line a 9×13-inch baking pan with parchment paper.
2. Whisk the flour, cocoa powder, baking powder, and salt in a medium bowl.
3. Beat the butter, granulated sugar, and brown sugar until creamy and smooth.
4. Add the eggs, vanilla extract, red gel food coloring, and vinegar, then mix until evenly combined.
5. Add the dry ingredients to the wet ingredients and mix just until a soft red velvet dough forms.
6. Reserve a small handful of dough for crumbs, then press the remaining dough evenly into the prepared pan.
7. Bake for 22 to 26 minutes, or until the edges are set and the center looks baked but still soft.
8. Bake the reserved dough separately on a small parchment-lined tray for 8 to 10 minutes, then cool and crumble it.
9. Cool the cookie bar base completely before frosting.
10. Beat the cream cheese and butter until smooth, then mix in powdered sugar, vanilla extract, and heavy cream until creamy.
11. Spread the frosting over the cooled bars, then top with red velvet crumbs and white sprinkles.
12. Chill for 30 minutes before slicing into clean squares.
Notes
Do not frost the bars while they are warm. Warm bars will melt the cream cheese frosting and make the top messy instead of smooth and sliceable.
- Prep Time: 20 minutes
- Cook Time: 26 minutes
- Category: Dessert
- Method: Baking
- Cuisine: American
Nutrition
- Serving Size: 1 bar
- Calories: 315
- Sugar: 28g
- Sodium: 135mg
- Fat: 17g
- Saturated Fat: 10g
- Unsaturated Fat: 6g
- Trans Fat: 0g
- Carbohydrates: 38g
- Fiber: 1g
- Protein: 4g
- Cholesterol: 65mg
Keywords: red velvet cookie bars, red velvet bars, easy dessert, holiday baking, Valentine’s Day desserts, Christmas treats, cream cheese frosting bars, dessert ideas